That
is why I decided to do this tutorial. I
want to take some of the fear away from you.
Proper structure under your cake will (or should) alleviate 80% of your
worries (the other 20%? Can we really
trust the people at the venue NOT to touch the cake?). Now, there are resources out there if you
want to research how to correctly build a tiered cake on pillars. This tutorial is for a stacked cake, simply
because in all my years of decorating
(almost 10) I have only ever had to do 1 cake on pillars, and that was
only 1 pillared tier on a few stacked tiers.
Not only will this be a very sturdy structure for your cakes, it will
make positioning of the tiers easy.
To
make the base, you will need:
·
5/8 – ¾ inch ply wood cut to desired size
·
¼ inch mdf or cardboard cake drums in sizes of
your tiers
·
½ inch wooden dowel
·
Drill and bits
·
Wood glue
·
Screws
·
4 wood blocks cut from leftover plywood
·
Contact paper
·
pencil
·
Ruler or other straight edge
·
Saws – jigsaw and hand saw
·
Glue gun
Step 1
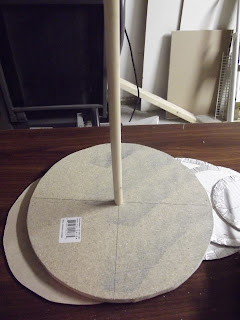
Draw central
line down middle of base and an intersecting line horizontally across the
middle (this is easy on squares – your lines will be drawn at the half distance
points easily measured out; in circles,
your lines will go from 12 o’clock to 6 o’clock and 9 o’clock to 3
o’clock). Where the lines intersect is
the true center of your board. Repeat
this on all tier bases (if using cardboard, draw your lines on the back)
Using a “flat”
style ½ inch drill bit (or similar in same size of central dowel), drill a hole ¾ of the way down on your base board,
and completely through each tier board (again, if using carboard circles, make
sure central holes are cleaned up with an X-acto blade)
Step 3
Insert wood
dowel to make sure it fits snug. Place
your rounds on top to make sure they line up nicely
Step 4
Glue the 4
blocks and attach to the bottom of your plywood base. Be liberal with your glue. I prefer wood glue or gorilla glue for this
over hot glue.
Step 5
Once glue has
had a bit of time to set up, drill some pilot holes in the blocks, then secure
blocks to base with small wood screws (make sure they are not too long that
they go through the top of your base)
Step 6
Cover your
board with contact paper (the dollar store variety works just fine). Use X-acto blade to clear hole in middle of
board
Step 7
Decorate your
base board as desired. Make sure to
clear the central hole so you can affix your dowel.
Step 8
Place a small
amount of glue in the hole and attach your dowel. I like to secure it through the bottom with a
wood screw (the flat drill bit will leave a small pilot hole in the bottom of
your board so you will know exactly where to position the screw). This can only be done once your cakes are
made and covered in fondant – you need to measure the height of all your tiers
and then cut your dowel to the length of their sum less ½ the height of your
top tier (Confusing I know…. If you have 4 tiers all four inches tall, their
sum is 16 inches; 16 inches less 2 (half of the top tier) is 14 and that is how
long I will cut my dowel)
Stack your
cake by starting with the bottom tier (duh!) and sliding it down the central
dowel (I position one hand on top one on bottom to minimize damage to my
fondant). Add support dowels like you
normally would (either wood or bubble tea straws would suffice). Repeat for your remaining tiers. Since you cut the central dowel short, it
will not protrude from the top tier.
Finish the
edge of your base with ribbon and hot glue
Even a cake as tall as the one shown here could be transported safely by folloowing these steps! I hope you enjoyed this tutorial as much as I enjoyed sharing it! I plan on doing more tutorials in the future, so please be sure to follow my blog if you aren't already. Until next time, Happy Caking!!


