Friday, September 20, 2013

The Secret I've been dying to share.....A Canadian busts onto the Craftsy scene!!

Hi Cakeland!

You all know how much I love Craftsy classes and stand behind the quality and instructors.  If you can't get to a live class for whatever reason, then Craftsy is the next best thing!  The newest class on the roster is no exception!  Now, I have long wanted my own Craftsy class, and it is still something I hope to do sooner than later.  But until that dream comes true, I am ecstatic (actually over the moon) to share that a Canadian has broken onto the Craftsy scene!


That's right!  In just 5 short days, Craftsy will launch "Small Cakes, Big Business", starring none other than my BCF, Chrissie Boon!  I can never sing Chrissie's praises enough - a wife, a mother of 3 (including the cutest 6 month old I've ever seen), an award winning cake designer, a successful entrepreneur (her store Icing Inspirations is my favorite place on earth as you know), organizer of the upcoming cake event of the year - Cake Carnival, and now Craftsy instructor!  And I should throw in she is also the bestest friend a cake dude could ask for!


Now, Chrissie can't share any video with me until class launches on September 25th, but she was able to give me the lowdown on what this class is all about.  It is a decorating class and business class tied into one - and you all know I love a 2-for!  Chrissie understands our struggles with customers who want custom cakes but don't wanna pay custom prices - and we all have em!  In "Small Cakes, Big Business", Chrissie will teach you how to supplement your cake income by building a line of cakes that are not time consuming for the decorator, but still offer customers somewhat of a custom look.  This is something I can't wait to include in my cake offerings - it is an awesome idea!
 
Yes, I know Chrissie personally, and can attest that what you see is what you get.  She is as nice in person as she comes across on screen, and she really does want to see her students and customers succeed!  She is one of the biggest advocates for squashing the nastiness that is often prevalent in our industry, and I commend her for that!  In her own words, "there is enough cake for everyone" - words that have resonated with me since I interviewed her for the blog a few years ago.  Chrissie wants you to succeed so much that one lucky reader will get the chance to win her Craftsy class for free along with a $25 gift card for Icing Inspirations.  All you have to do is click on the link below and you will be entered in the contest.  But hurry - Craftsy will pick one luck winner right before the class launch Wednesday!
 
 
If you want to learn how to grow your cake business and maybe finally turn a profit, then "Small Cakes, Big Business" is the class for you! Mark your calendars, and get the class September 25th.  And if you want to meet Chrissie in person she will be at Toronto's Baking & Sweets Show next weekend, the Montreal Cake Show October 19-20 (where we are both teaching), and will also be hosting Cake Carnival (where 4 other Craftsy instructors will be among 6 of the world famous intructors) November 6-8.
 
Until Next Time,
Happy Caking!


Saturday, August 3, 2013

Marina Sousa Has Done It........Again!

Hi Cakeland!

As you all know, I am a big advocate of furthering your education, learning new skills and expanding on ones you already have.  Now although nothing can beat taking a hands on class, Craftsy offers great classes that you can watch online over and over again, whenever, wherever you want.  Their most recent offering is from someone I loved learning from in person as well as from her other Craftsy classes.  Marina Sousa has blown my mind once again with fresh takes on decorating cakes effectively giving a wow factor with minimal effort!

In "Designer Fondant Textures", Marina offers up a plethora of decorating methods that result in eye-catching, stunning cakes....but, would I expect anything less from Marina?  Techniques covered in the class (each section offers multiple ways of achieving the look being discussed) include: Sequins, Ruching, Fringe, Zebra Print, Geometric Textures, and Ruffles.  The great thing about this class (as well as Marina's other classes - Advanced Fondant Techniques and Jewelled Wedding Cake) is that Marina offers up a variety of techniques that look great on their own or can be mixed and matched to achieve stunning, show stopping creations.  I have taken many classes, and still continue growing and learning new things - this class is no exception!  My mind was exploding watching this class and learning some new tricks that I need to seriously find time to try!


Marina has to be one of the easiest instructors to listen to.  She is well spoken, clear, and her effervescent personality really comes through each and every time!  If you haven't yet purchased this class or any of Marina's other classes, please head over to Craftsy and do so....you will not be disappointed!  And once you get a taste of Marina's amazing teaching style, you will want to learn from her in person....why not join her at Cake Carnival (along with 5 other amazing instructors) this November?  There are still a few spots left....don't miss your opportunity to get the Marina experience first hand!
 
Until Next Time,
Happy Caking!!!

Wednesday, July 10, 2013

Marvelous Molds has done it…..Again!


Hi Cakeland!  I am so happy summer is finally here – better late than never I say.  One of the things I love about being in this industry, is the people I get to talk to and deal with on a regular basis.  Now you all know I am a cake toy JUNKIE!  Imagine my excitement that day in May when I get a text from my BCF (for you newbies, that’s Best Cake Friend) telling me to go check out the new products up for pre-order online at her store Icing Inspirations.  They were called “Onlays” ….

 The first few patterns I saw were very cool – knowing Marvelous Molds made them, I had no question about the quality – everything MM does is top of the line.  What had me intimidated was the time it would take me to transfer the intricate designs onto my cake – time is $$$ after all!  Then I watched Chef Dominic’s (owner of Marvelous Molds and creator of Onlays) master class on using onlays.  I was blown away!  I was intimidated for no reason. If anything, the  Onlays were going to make my decorating even faster.  Who could ask for more?  My pre-order was placed, and all that was left for me to do was to sit back and wait (and dream up all kinds of new cake designs).  In true Icing Inspirations style, I got my order in record time, and worked my busy wedding cake schedule over a bit to make time to play….and make a tutorial for my readers of course ;)

 
My Icing Inspirations Onlay Order (plus some other cool stuff)


I picked two onlays for my first attempt – took every ounce of my being to edit it down and stick to a simple, yet elegant design.  The onlays I used for this tutorial are called ooh la la (top tier) and double wedding ring (bottom). 

I started with 3 dummies covered in pink fondant.  The middle tier was hand painted with silver highlighter mixed with lemon extract. 

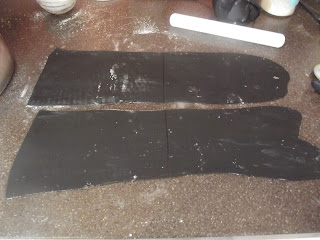
To do the bottom tier, I rolled black fondant mixed with a bit of gum tragacanth (Fondarific is my fondant of choice)  the width of my Kitchenaid Pasta roller attachment to a number 2 – very important to note: the “cutting blades” on the onlay are the perfect height for a 2 on the KA.  Tip: Roll and cut all of the pieces you will need and keep them under layers of plastic wrap.


I lightly corn starched the onlay and tapped the excess out. 

Place the piece of fondant  on the onlay and press well to “cut” your pattern.  Brush the back of the design with adhesive (I love this edible sugar glue by Rainbow Dust). 

 Remove the negative spaces (those areas you don’t want attached to the cake).  Line the straight edge of the onlay flush with the base of the tier and rub/press the silicone to get a good adhesion to the cake. 


Continue this until you get the desired look you want. 
 
Something awesome that Chef Dominic has done is to create the onlays to be 2 times pi long.  For the not so math savvy, this is exciting because it means that on any EVEN diameter round cake, you will get perfect fitting without any seams meaning on a 6 inch round, 3 onlays fit perfect (8 inch uses 4, 10 inch uses 5, 12 uses 6, so on and so forth).  The Onlays are also constructed to line up to one another perfectly as you can see in the picture above.
I allowed the fondant to dry a bit before painting silver with the same mixture I used on the middle tier.

I repeated the process with the ooh la la onlay on the top tier, except I placed it in the middle of the tier.


Stack your cakes and embellish your cake drum as desired.

 For the flower and embellishment on the top tier, I used pink 50/50 in Elissa Strauss’ new beaded button molds.  For the flower center, I added a 20g wire bent in an “L” and allowed it to dry. 

 The other buttons were made same way (sans wire) and allowed to dry.  I painted all of the buttons with a silver paint pen by Rainbow dust.   And brushed the center with sugar glue and dipped in pink disco dust. 


The flower petals were made using Peony cutters by Collette Peters (2nd and 4th biggest).  I veined the wired petals using James Rosselle’s Parrot Tulip veiner and dried in an empty apple tray. 

To get the curl on the tips, I simpleyplaced my ball tool on the top edge of the petal and using firm pressure, bring it towards the center. 


The petals were then dusted in Hot Pink petaldust and steamed to set the color.  I taped the petals around the center, and voila – a gorgeous fantasy flower!
 

Using white chocolate, I attached 5 buttons to the top tier and placed the flower.  Trim the cake seams with diamanite ribbons.
 

The onlays went on the tiers so easy and made the cake look very sophisticated!  Best of all, my decorating time was cut down immensely! 

The finished cake!


I have already ordered the majority of the onlays and will be finishing off the set shortly.  I have already heard from a contact of mine from Marvelous Molds, that these are the first patterns in a series, and new patterns will be added in time - I.  CAN’T.  WAIT!!

If you wanna get your hands on some onlays, head over to the Marvelous Molds site.  They retail for between 12 & 29 dollars – very reasonable for the quality you get!  Everything (including Onlays)  I used on the cake for the tutorial is available at Icing Inspirations (links to individual items are included wherever possible ;) ). 

Keep your eyes posted here for more product reviews and tutorials in the future.

Happy Caking!

Sunday, May 26, 2013

Tutorial - Making a Sound Structure for Stacked Cakes

               One of the most nerve wracking things in every cake decorators life is delivery!  You know it, we have all been there……Not only are you making sure you’re transporting it safely, you have to drive for everyone else on the road too.  And our fears don’t stop there – once we get to the venue and set up, you likely continue worrying until the day after the event and you DON’T get that dreaded call saying the cake had “an accident”.

                That is why I decided to do this tutorial.  I want to take some of the fear away from you.  Proper structure under your cake will (or should) alleviate 80% of your worries (the other 20%?  Can we really trust the people at the venue NOT to touch the cake?).  Now, there are resources out there if you want to research how to correctly build a tiered cake on pillars.  This tutorial is for a stacked cake, simply because in all my years of decorating  (almost 10) I have only ever had to do 1 cake on pillars, and that was only 1 pillared tier on a few stacked tiers.  Not only will this be a very sturdy structure for your cakes, it will make positioning of the tiers easy.


                To make the base, you will need:

·         5/8 – ¾ inch ply wood cut to desired size

·         ¼ inch mdf or cardboard cake drums in sizes of your tiers

·         ½ inch wooden dowel

·         Drill and bits

·         Wood glue

·         Screws

·         4 wood blocks cut from leftover plywood

·         Contact paper

·         pencil

·         Ruler or other straight edge

·         Saws – jigsaw and hand saw

·         Glue gun


Step 1

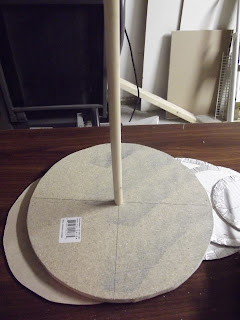
Draw central line down middle of base and an intersecting line horizontally across the middle (this is easy on squares – your lines will be drawn at the half distance points easily measured out;  in circles, your lines will go from 12 o’clock to 6 o’clock and 9 o’clock to 3 o’clock).  Where the lines intersect is the true center of your board.  Repeat this on all tier bases (if using cardboard, draw your lines on the back)

 Step 2

Using a “flat” style ½ inch drill bit (or similar in same size of central dowel), drill  a hole ¾ of the way down on your base board, and completely through each tier board (again, if using carboard circles, make sure central holes are cleaned up with an X-acto blade)
 

Step 3

Insert wood dowel to make sure it fits snug.  Place your rounds on top to make sure they line up nicely


Step 4

Glue the 4 blocks and attach to the bottom of your plywood base.  Be liberal with your glue.  I prefer wood glue or gorilla glue for this over hot glue.


Step 5

Once glue has had a bit of time to set up, drill some pilot holes in the blocks, then secure blocks to base with small wood screws (make sure they are not too long that they go through the top of your base)


Step 6

Cover your board with contact paper (the dollar store variety works just fine).  Use X-acto blade to clear hole in middle of board


Step 7

Decorate your base board as desired.  Make sure to clear the central hole so you can affix your dowel. 


Step 8

Place a small amount of glue in the hole and attach your dowel.  I like to secure it through the bottom with a wood screw (the flat drill bit will leave a small pilot hole in the bottom of your board so you will know exactly where to position the screw).  This can only be done once your cakes are made and covered in fondant – you need to measure the height of all your tiers and then cut your dowel to the length of their sum less ½ the height of your top tier (Confusing I know…. If you have 4 tiers all four inches tall, their sum is 16 inches; 16 inches less 2 (half of the top tier) is 14 and that is how long I will cut my dowel)

 Step 9

Stack your cake by starting with the bottom tier (duh!) and sliding it down the central dowel (I position one hand on top one on bottom to minimize damage to my fondant).  Add support dowels like you normally would (either wood or bubble tea straws would suffice).  Repeat for your remaining tiers.  Since you cut the central dowel short, it will not protrude from the top tier.

 Step 10

Finish the edge of your base with ribbon and hot glue


           Even a cake as tall as the one shown here could be transported safely by folloowing these steps!  I hope you enjoyed this tutorial as much as I enjoyed sharing it!  I plan on doing more tutorials in the future, so please be sure to follow my blog if you aren't already.  Until next time, Happy Caking!!

Wednesday, January 30, 2013

Major Class Annonuncement

Hi Cakeland

I know it has been a while since my last post, but I have been extremely busy working on a few cake related projects that I hope to share with you all very soon!


If you're as big of an Icing Inspirations fan as you know I am, you'll know their website is currently down for a complete overhaul, but that's not a bad thing.  One of the reasons I love them so much is the amazing customer service they give - and this seen through every stage of the order process from their product knowledge to the super fast shipping.  Currently, if you need to place an order or sign up for a class, you can either email them at chrissie@toonicetoslice.ca or give them a call at 519-576-3364 and get the experience of top notch service!  One benefit of being BCFs with Chrissie is that I get a heads up when new stuff comes in, and fresh from the recent celebrity class with my crush Kaysie Lackey, Icing Inspirations has if stock Kaysie's two DVDs on panelling/box cakes and a tree stump cake.  I am still reeling from not being able to attend Kaysie's class (thanks to my wife's bday, but I am NOT bitter ;) ).  I am optimistic Kaysie will return to Icing Inspirations in the future.

Speaking of classes, it seems Icing Inspirations students cannot get enough of one instructor in particular - the uber talented Karen Portaleo!  Karen is known for her lifelike sculpted cakes, and she will be back at II in March for 2 classes - a flamingo and a super cute bunny.  I did hear seats are extremely limited and these two classes are almost SOLD OUT! 


And now that we're on the topic of Ms. Portaleo, I am very excited to be able to learn from her this coming November , when she returns to Icing Inspirations for Cake Carnival a 3-day fun filled cake extravaganza where Karen and 5 more amazingly talented instructors (Marina Sousa, James Roselle, Elisa Strauss, Joshua John Russell and Courtney Clark) take over Kitchener and team teach 3 great carnival themed projects.  Carnival will be the cake event of the year - surpassing even the annual ICES convention!  I have already reserved my spot in class, and to learn from 6 of the top artists in the world is well worth the $1200 price tag.  Think of it - if you break it down into 10 payments, youre looking at $120 each payment and it is one of the best investments you can make in yourself as an artist in my opinion.  When these teachers teach individually, a 3-day class goes for $800-1400 easily - you'll get 6 instructors for the price of one!  If you want to secure a spot in Cake Carnival (taking place November 6,7 and 8), just call or email the store and sign up.  They do offer payment plans, and I know for a fact the seats are well on their way to being sold out!  Don't miss your chance - this could be a once in a lifetime opportunity!!!

Until next time,
Happy Caking!